 GOOD NEWS! I just completed testing the first two ODAC boards from YoYoDyne. These are known as “first articles” and are built using the same PC boards and parts as the production boards. I’m pleased to report the performance essentially matches the previous prototype I measured in every area and has significantly lower jitter. I still need to publish my final large ODAC article with all the measurements and more technical details, but my involvement is otherwise coming to an end. That’s good news as I can spend more time on the open source DIY Obective Desktop Amplifier (ODA).
AVAILABILITY: I’m not involved with the manufacturing, sales, or, for that matter, receiving any profit. So you need to contact one or more of the following if you want an ODAC. Last I heard, they’re still hoping to ship some before the end of the month:
- YoYoDyne Consulting ODAC Announcement (Canada)
- JDS Labs ODAC Announcement (USA)
- Epiphany Acoustics ODAC Announcement (UK)
- Head-N-HiFi ODAC Announcement (Switzerland)
- Audio Poutine ODAC Source (Canada Facebook Page)
ODAC CANNOT DRIVE HEADPHONES DIRECTLY: There still seems to some confusion the ODAC is a headphone DAC by itself. It’s not. You need some sort of headphone amp like the O2 (the ODAC fits inside), the upcoming ODA, a FiiO E5/E6/E9/E11, etc.
O2 + ODAC: As previously discussed, when combined with the O2 and wired to the input jack as shown in the Tech Section below, you can still use the line input jack of the O2. When a jack (say from a portable player) is plugged into the jack the O2 will disconnect the ODAC and play the external source. When you unplug the jack the O2 will switch to the ODAC. If you don’t have either source powered up you may hear some hum and/or noise due to the floating input.
SCHEMATIC: YoYoDyne has received approval from Tenor to release the schematic once. More on that in the next ODAC article.
200 COMMENT LIMIT: With some help from friendly blog readers I’ve found a work around for the 200 comment limit. It’s not perfect, and sometimes doesn’t work with Internet Explorer or mobile browsers, but clicking the “Load More…” or “Loading…” link at the end of the comments should load at least some of the newer posts. As long as you see either of those links, there are newer comments not being shown. Hopefully, if I can publish articles more frequently to spread out the comments, you won’t have to worry about it.
WHAT’S NEXT: I’m still working on my Timex vs Rolex article. It’s been my most daunting article yet and I’ve only had limited free time. But it’s hopefully coming Real Soon Now… Really! Honest! There’s also the final large ODAC article with the rest of the measurements and more tech background on the design. And, beyond that, look for the next ODA article. I’m still hoping to have at least a preliminary ODA design published before the end of summer.
TECH SECTION
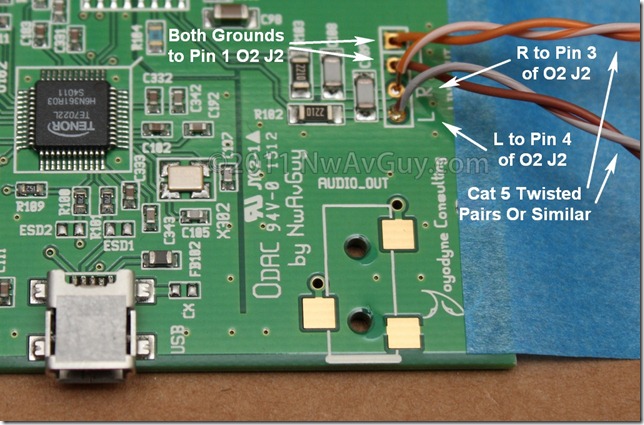
ODAC TO O2 WIRING: Use twisted pair wiring, such as you can find inside any CAT5 ethernet cable or similar. You can also use small shielded wire but it might be harder to “route” within the O2 enclosure. The photo below shows the twisted pairs connected to the ODAC output header. Note the grounds are together (click for larger if desired):
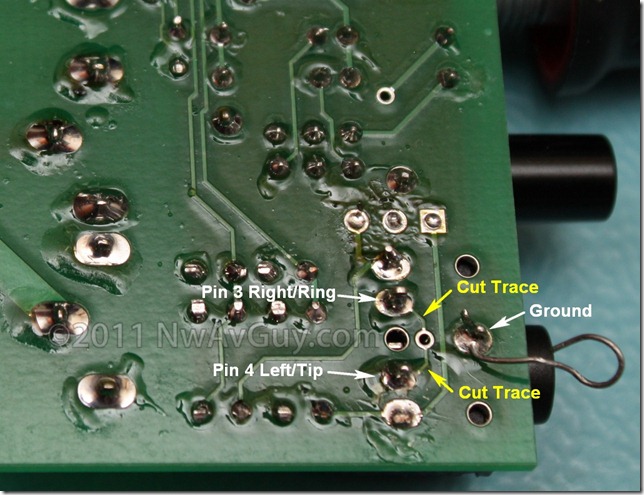
O2 INPUT JACK CONNECTIONS: There are two options for connecting the ODAC to the O2. If you no longer want to use the input jack, you can just connect to the P1 header alongside the input jack. Left connects to pin 1 (the square pad), the middle pin (2) is ground and pin 3 is the Right input. You must cut the ground traces as shown in the photo with a razor blade or similar. Be careful not to accidentally cut other traces (or yourself!). If you have a DMM you may want to use the Ohms range to verify there’s no longer a short (near 0 ohms) from pin 3 and pin 4 to ground sometimes traces that look cut are not. If you want to still use the input jack, the twisted pairs from the ODAC must be routed to the bottom of the O2 board and connected to the input jack as shown. This can be done through the unused pin pads for the volume control, through an unused mounting hole, or there might be clearance between the front panel and the O2 board—it will depend on the type of wire you use. Keep the wiring as short as possible. The ground wires (and the chassis ground wire) can all attach to the center pin 1 of the jack closest to the front edge of the board or to pin 2 of the P2 header nearby:

LOWER JITTER: There were a few minor PCB and other tweaks between my protoype ODAC and the production boards from YoYoDyne. I’m pleased to report the production version has even lower jitter. In the last ODAC article I reported the jitter components adding up to –103.3 dB. In the production version, as you can see below, it’s over 3 dB better at –106.5 dB with far fewer components. In reality both of these are comfortably below the –100 dB threshold I’ve established for transparency, so I’m not suggesting this is an audible benefit, but it’s still nice to see:


